While you are developing a web application in Java it is quite often require to deploy your .war file to a web application server like Apache Tomcat. Have you ever thought of integrating Apache Tomcat server in eclipse.
This tutorial will guide you step by step to install Tomcat server in eclipse. It is quite easy to Install Apache Tomcat Server in Eclipse IDE.
It is quite easy to Install Apache Tomcat Server in Eclipse IDE.
Prerequisites to install Apache Tomcat Server in you eclipse IDE are :
1. Java 6.0 or above should be installed. Better to always set current Java Version.(This tutorial is considering JDK 1.6.0_20 and jre 6.0).
2. Apache Tomcat Server should be already configured in your machine(This tutorial is considering apache-tomcat-6.0.20).
If the above Prerequisites are satisfied, we can go with this article to “Installing and configuring Apache Tomcat Server In Eclipse IDE“. Go with the Steps given below.
Step 1 : Locate Apache Directory
Please see the installation directory of Apache Tomcat Server in your System.
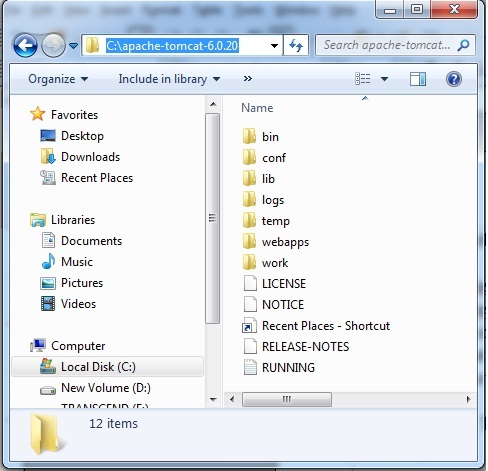
For me Apache Tomcat Server directory is : C:\apache-tomcat-6.0.20
Please See the below image for more clarification. The below image is Apache Tomcat Server directory in my Computer. You can see bin, conf, lib, logs, temp, webapps, work, Licenseand other files in my directory image given below (C:\apache-tomcat-6.0.20).
 |
| Apache Tomcat directory in my system |
Step 2: Test Apache Tomcat Server installed in your system by starting it from command prompt
Open command prompt and go to bin directory of Apache Tomcat Server.
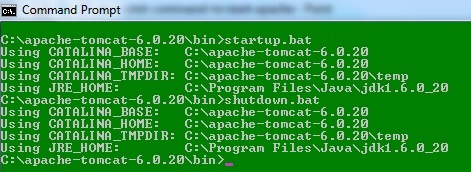
For example I have to type like C:\apache-tomcat-6.0.20\bin>startup.bat in Command Prompt.
After this press Enter Key. Please see the below image for your reference.
 |
| starting apache tomcat server using command prompt |
See if Apache Tomcat Started or not. If not started then correct your configuration of Apache Tomcat Server. If it is not working from cmd, it will not work in Eclipse IDE also.
In case Apache Tomcat Started well below is the image of started Apache Tomcat.
 |
| apache tomcat server started successfully |
Open Internet Explorer and type
http://localhost:8080/
You will see Apache Tomcat Welcome Page.
Once you tested the Apache Tomcat successfully please do not forget to stop it from command prompt or just close Apache Tomcat. In command prompt call
shutdown.bat to stop running Apache Tomcat.
C:\apache-tomcat-6.0.20\bin>shutdown.bat
Please see image below
 |
| starting and stopping tomcat from command prompt |
After this come to our main goal to install Apache Tomcat Server in Eclipse IDE. Please follow these steps to configure Apache Tomcat Server in your eclipse IDE.
Step 3: Opening Eclipse and Opening Server Panel In Eclipse
Please start Eclipse IDE and provide a workspace. After that follow the steps given below.
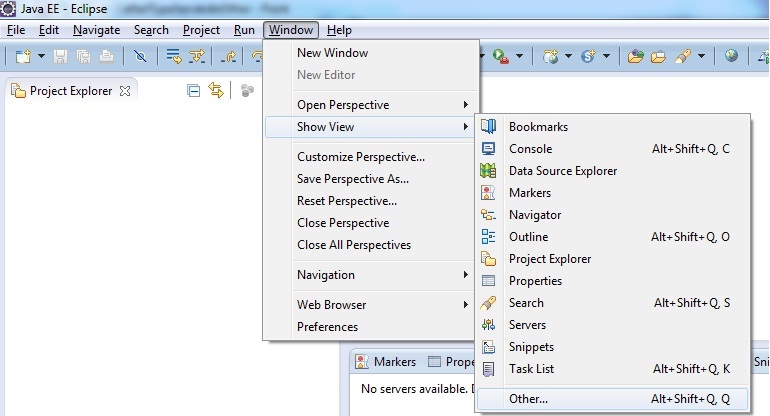
In Eclipse go to window>Show View>Other.. (pleaes see image 1)
-
Say Ok.
Image 1
 |
| show server panel in eclipse |
-
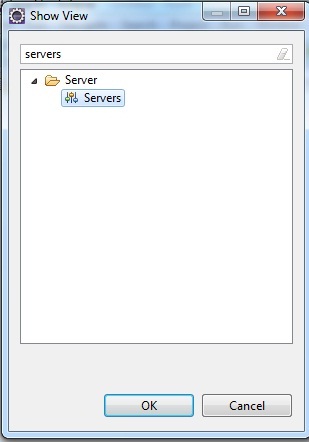
When you will say OK to Other Option a new window will be opened in the eclipse IDE like this where you have to type “Servers”. As In image I have typed (Please see image 2). Then Say OK.
Image 2
 |
| server panel in eclipse |
-
After saying ok you will receive the server activity panel in Eclipse. Which will be shown like the image shown in image 3.
image-3
 |
| server panel in eclipse |
Step 4 : Configuring Apache Tomcat Server In Eclipse
In the above step 3 we have shown you the Server panel in Eclipse IDE and how to go to that panel.
Once you have found out the the Server Panel in Eclipse next we have to configure Apache Tomcat In Eclipse IDE in this step.
Please follow the following steps.
1. Now go to server panel > Right click your mouse > New > Server . Please See
image 4.Then say OK.
image 4
 |
| select new > server to configure your server in eclipse |
2. You will receive image like image 5. Please see image 5. In that image you have to choose folder “Apache”. Extend the “Apache”folder. After that select the Apache Tomcat Version you have. I have apache-tomcat-6.0.20. So I have selected “Tomcat v6.0 Server”. So in this way suppose either you have 5.XX or 7.XXthen you will choose “Tomcat v5.0 Server” or “Tomcat v7.0 Server” respectively and click next.
Image 5
 |
| selecting server name in eclipse ide |
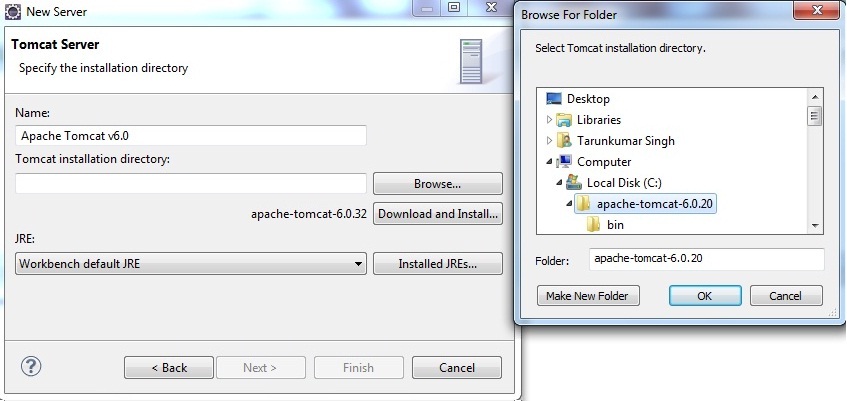
After clicking next you will receive image as shown in
image 6. Please refer
image 6 for good reference. In this image you have “
Browse” button. Please click on the “
Browse” button and tell the path of your Apache Tomcat installation directory to Eclipse IDE. Say Ok.
In
image 6 we have two images. Please look into both images.
image 6
 |
| main step to configure server in eclipse |
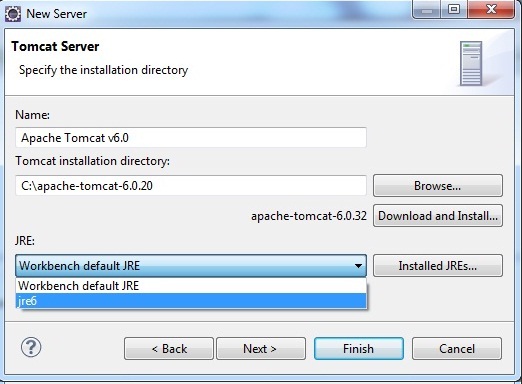
Once you have given apache tomcat directory, you need to configure JRE. Please select jre version as shown in the image 7. I have jre6 configured in my system.
image 7
 |
| showing how to select jre in eclipse |
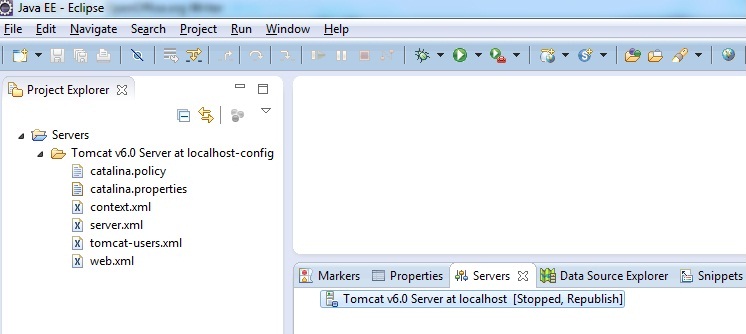
After selecting jre please say Finish. You can see the image like image 8.If you have same image like shown below then you have done almost.
Image 8
 |
| successful installation of apache tomcat server |
So image 8 says you have all set with Apache Tomcat installation in your Eclipse IDE.
Further you must see that your Apache Tomcat in Eclipse IDE has been installed correctly or not. To check this you should start you Apache Tomcat Server in Eclipse.
Step 5 : Testing Apache Tomcat Server In Eclipse(Starting Eclipse Server)
In this step we will start our Apache Tomcat Server which has been installed within Eclipse IDE already. Suppose Apache Server has been started successfully then Apache Tomcat Server is installed within Eclipse IDE successfully. Please follow the instructions mentioned below to see whether Apache Tomcat has been installed or not.
Go to servers panel > mouse right click > start
Please see image start-apache-tomcatfor more clarification.
image : start-apache-tomcat
 |
| how to start apache tomcat server in eclipse |
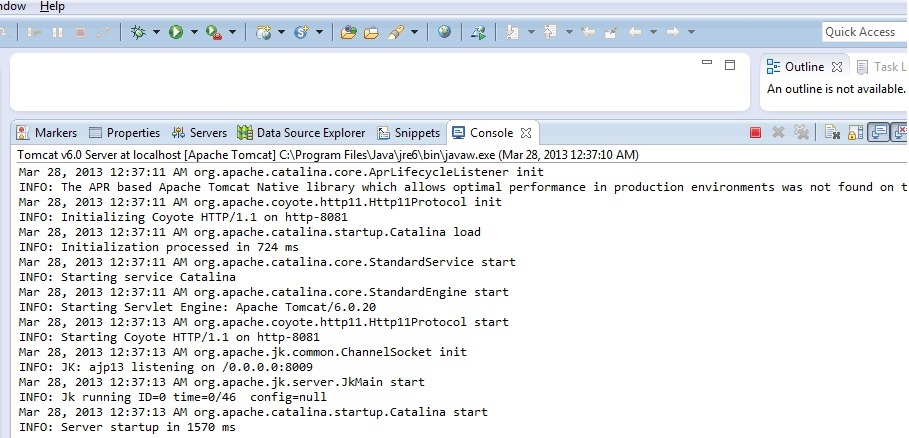
If the server started correctly then go to eclipse > console. You will see the log like image start-tomcat-success (eclipse console screen).
image : start-tomcat-success (eclipse console screen)
 |
| console log after successful installation of server |
Please go to eclipse > Server. The image will be like image start-tomcat-success (eclipse Server screen).
image : start-tomcat-success (eclipse Server screen)
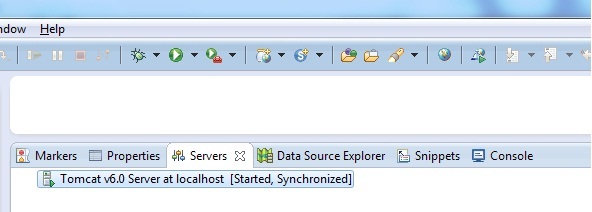 |
| apache tomcat server after starting sucessfully |
In case your server is not started successfully you will not get these screens like images “start-tomcat-success (eclipse console screen)”and “start-tomcat-success (eclipse Server screen)”.in your eclipse IDE. In server console it will show like image 8,i.e. stopped always even you have given start command to the apache tomcat server.
Step 6 : Typing URL (http://localhost:8080/) will not show Apache Tomcat Server Home Page
This step is just to give information that after starting apache tomcat from eclipse then type http://localhost:8080/ in browser. Browser will not deliver Apache Tomcat home page screen as given below in image.
Apache_Tomcat_Home_Page.jpg
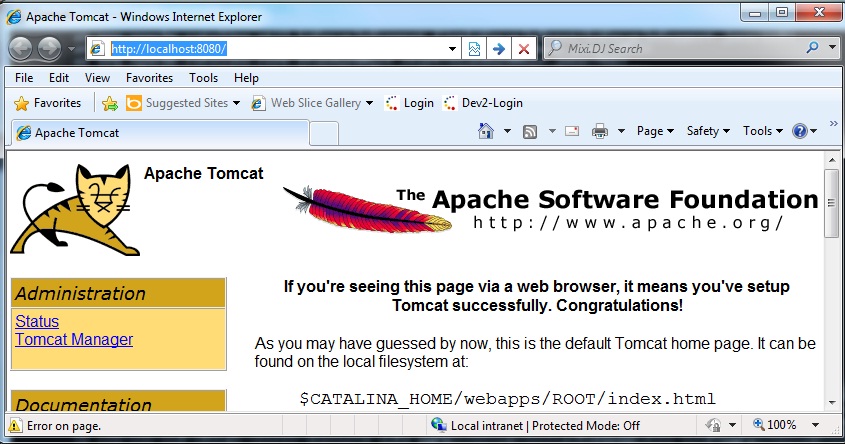 |
| Home Page – Apache Tomcat Server |
Remember, You will not get Apache Tomcat Home page. You need to create a Dynamic or Static web Project then you need to deploy this Web Project in Apache Tomcat installed within the Eclipse IDE to see You web application running in Apache Tomcat installed within Eclipse IDE.
Thats all ! We have done. Thank you very much for reading this full article.


